
To use self adhesive laminating sheets, you must clean your document first, then peel back one corner of the release liner, align the exposed adhesive edge with your document, and press the sheet down slowly while pulling the liner away and smoothing out air with a squeegee or credit card. No machine, no heat, and no electricity are involved at any point. The pressure of your hand activates the adhesive, which is why this product category is also called cold or pressure sensitive lamination.
That simple description hides a few details that separate a crystal clear result from a bubbled, wrinkled mess. Thousands of people look up self adhesive laminating sheets on how to use guides every month, and most run into the same handful of first attempt mistakes. This guide walks through the entire process, then covers sizes, project ideas, common errors, and where to buy.
What Are Self Adhesive Laminating Sheets?
Self adhesive laminating sheets are clear plastic films coated on one side with a pressure sensitive adhesive and backed with a peel away release liner. The film layer is usually PVC, PET, or polypropylene, and it protects paper items from moisture, fingerprints, tearing, and UV fading. Because the adhesive bonds through pressure alone, these sheets belong to the cold side of the laminating films family.
The peel and stick format makes them the most accessible lamination option for homes, offices, classrooms, and small print shops. There is no laminator to buy, no warm up time, and no risk of heat damage to inkjet prints or photographs. Anyone who can apply a large sticker can laminate a document in under two minutes.
How Self Adhesive Laminating Sheets Work
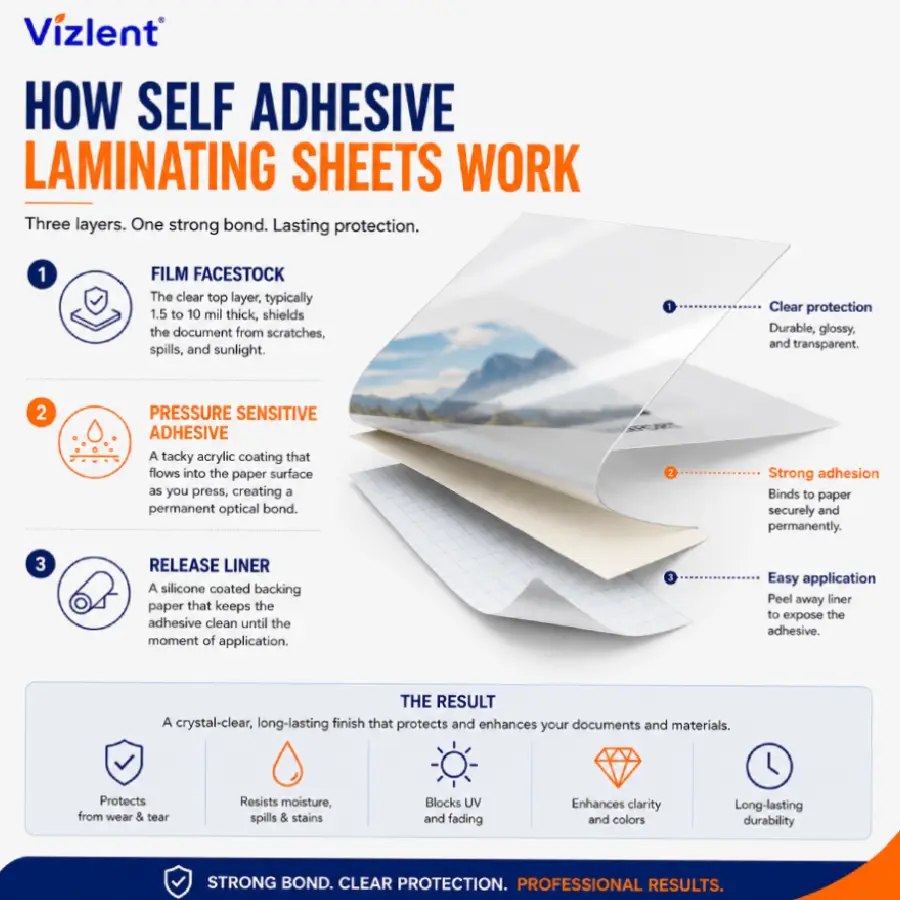
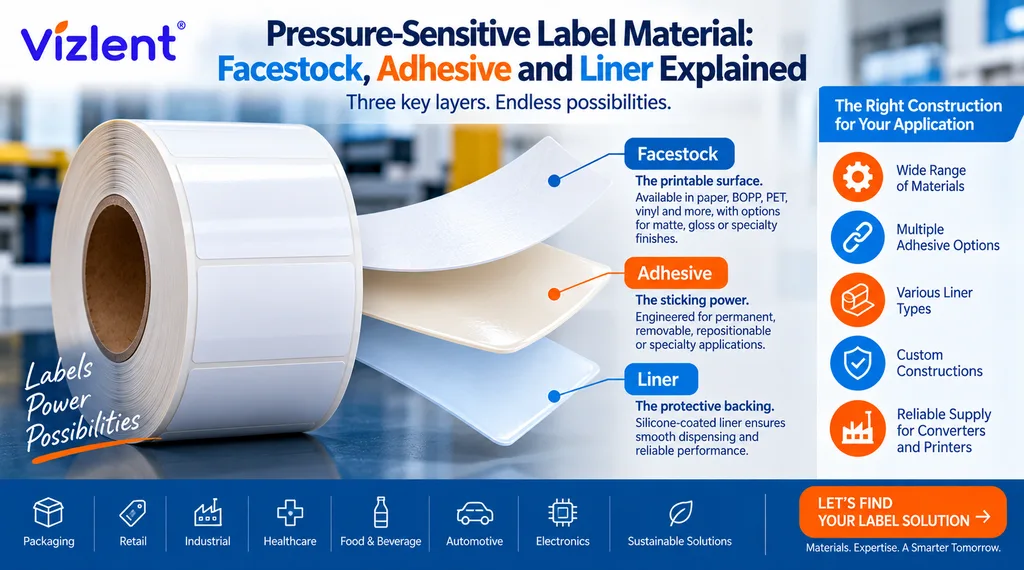
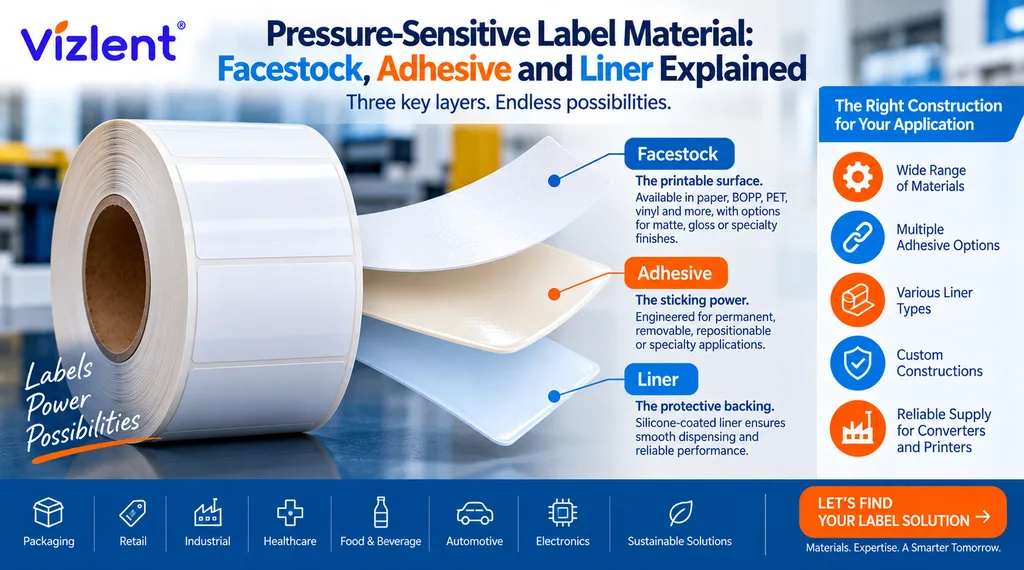
A self adhesive laminating sheet works through a three layer construction that bonds to paper using hand pressure instead of heat. Once you understand the layers, the application steps make far more sense. Each layer has one job, and the quality of each layer decides how the finished piece looks and lasts.
- Film facestock. The clear top layer, typically 1.5 to 10 mil thick, shields the document from scratches, spills, and sunlight.
- Pressure sensitive adhesive. A tacky acrylic coating that flows into the paper surface as you press, creating a permanent optical bond.
- Release liner. A silicone coated backing paper that keeps the adhesive clean until the moment of application.
When you press the film onto paper, the adhesive wets out across the surface and fills microscopic gaps between ink and fiber. Full bond strength develops over the next 24 hours as the acrylic continues to flow. This is the same mechanism used in industrial cold lamination films that protect warning labels on factory equipment for years.
Want to test the difference film quality makes? Vizlent ships free A4 sample sheets worldwide so you can compare clarity and tack before you buy. Request your free samples here.
What You Need Before You Start
Preparation is the difference between a flawless first attempt and a wasted sheet. Adhesive film grabs paper on contact and rarely forgives a crooked start, so gather everything before you peel anything. The full toolkit costs almost nothing and probably already sits in your desk drawer.
Here is the complete checklist:
- Self adhesive laminating sheets slightly larger than your document
- A clean, flat, dust free work surface
- A plastic squeegee, old gift card, or credit card for smoothing
- Scissors or a craft knife with a cutting mat for trimming
- A ruler for measuring borders and guiding straight cuts
- A lint free cloth to wipe the document and workspace
Dust is the enemy nobody thinks about until a speck is sealed under clear film forever. Wipe the table, wipe the document, and keep pets and open windows away from the work area. Wash your hands as well, since skin oils on the adhesive side create dull spots in the finished laminate.
How to Use Self Adhesive Laminating Sheets Step by Step
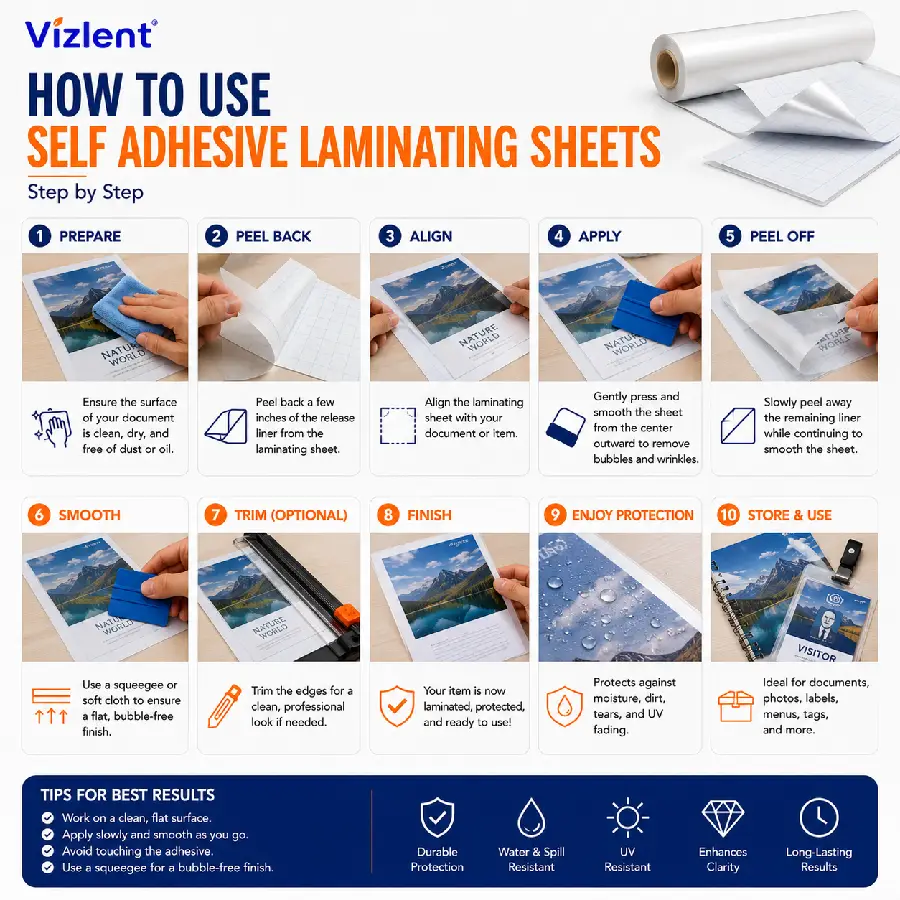
Working slowly from one edge to the other is the core technique behind every clean application. Rushing causes bubbles, and bubbles are nearly impossible to remove once the adhesive sets. Follow these self adhesive laminating sheets instructions in order and your first attempt will look professionally finished.
- Trim your document first. Cut the paper to its final shape before laminating so the film can form a sealed border around every edge.
- Position the sheet. Lay the laminating sheet liner side down over your document and check that a 3 to 5 mm margin of film extends past every edge.
- Peel back one corner. Fold back about 2 cm of the release liner along one short edge, creasing the liner so it stays out of the way.
- Anchor the exposed edge. Press the sticky strip onto the work surface just above your document, or directly onto the document edge, and rub it down firmly.
- Pull and smooth in one motion. With one hand pulling the liner away underneath, use the other hand to sweep the squeegee across the film in overlapping strokes.
- Work from the center outward. Push trapped air toward the nearest open edge rather than sealing it in the middle of the sheet.
- Burnish and trim. Rub the entire surface with firm pressure, flip the piece over, repeat on the back if double sided, then trim the border with scissors or a knife.
A self adhesive cold lamination film with a solvent acrylic adhesive gives you a short repositioning window during step 4, which is a genuine safety net for beginners. Cheaper films grab instantly and tear paper if you try to lift them. That single difference explains most of the horror stories people share about peel and stick lamination.
How Do You Use Self Adhesive Laminating Sheets on Both Sides?
Double sided lamination means applying one sheet to the front, flipping the piece, and applying a second sheet to the back so the two adhesive borders seal against each other. The overlapping film to film edge is what makes the finished piece water resistant rather than just scratch resistant. Menus, luggage tags, and pool signage all need this full envelope seal.
People often ask how do you use self adhesive laminating sheets on both sides without misaligning the second layer. The answer is to laminate the front first, trim nothing, then apply the back sheet using the front sheet’s edges as your visual guide. Trim both layers together in a single cut so the sealed border stays even, and consider a self adhesive material with a gridded liner if you do this often.
Choosing the Right Size: A5, A4, A3, and A2 Sheets
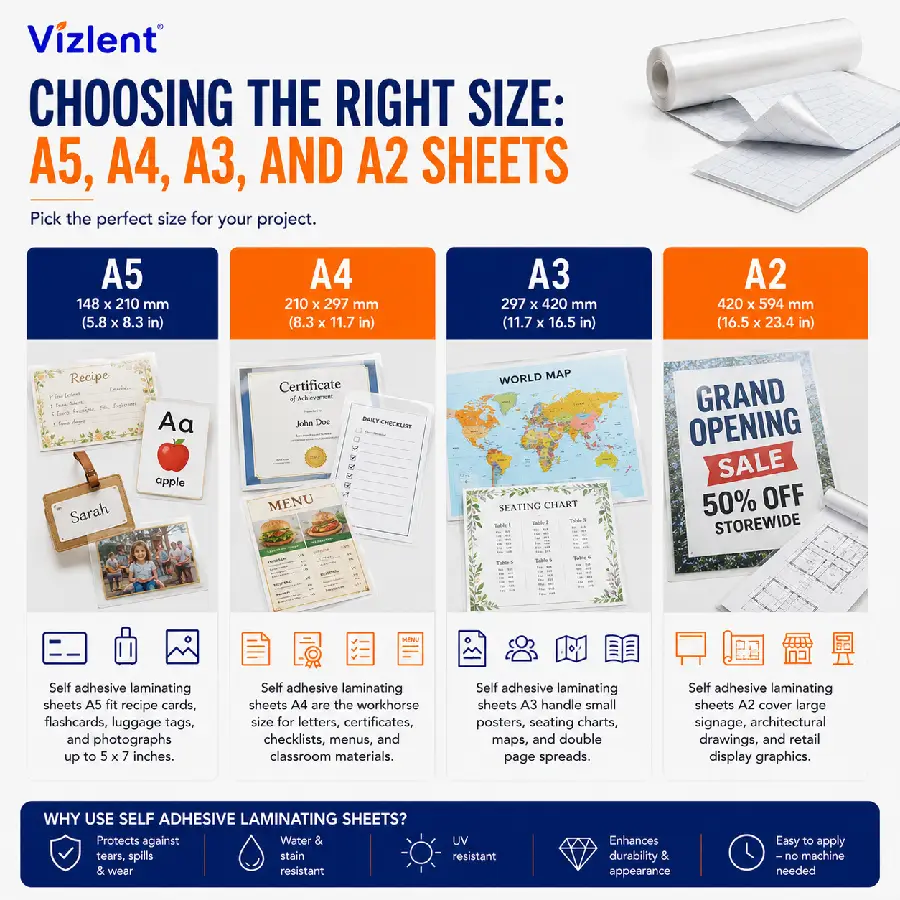
Sheet size should always run slightly larger than the document, never exactly equal to it. That extra margin becomes the sealed border that locks out moisture and keeps edges from lifting. Buying the correct size also cuts waste, because trimming an oversized sheet down throws away film you paid for.
The standard size ladder covers nearly every project:
- Self adhesive laminating sheets a5 fit recipe cards, flashcards, luggage tags, and photographs up to 5 x 7 inches.
- Self adhesive laminating sheets a4 are the workhorse size for letters, certificates, checklists, menus, and classroom materials.
- Self adhesive laminating sheets a3 handle small posters, seating charts, maps, and double page spreads.
- Self adhesive laminating sheets a2 cover large signage, architectural drawings, and retail display graphics.
Searches for self adhesive laminating sheets a4 near me spike every back to school season for a reason, since A4 and letter sizes cover the vast majority of everyday documents. If your projects vary, stock A4 as your base size and keep a small supply of A3 for the occasional oversized piece. Larger formats can always be pieced from rolls, though single sheets give cleaner results for anyone working by hand.
Best Projects for Self Adhesive Laminating Sheets
Cold lamination shines wherever heat would damage the item or a machine is unavailable. Inkjet photos, vinyl stickers, and heat sensitive thermal paper receipts all survive peel and stick film that would blister inside a hot laminator. The format also scales down to tiny items that no pouch machine handles gracefully.
The most popular applications include:
- Self adhesive laminating sheets for stickers add a clear protective layer over printable vinyl so homemade decals survive water bottles and dishwashers.
- Self adhesive laminating sheets for photos protect prints without heat, and a pH neutral photo cold lamination film prevents yellowing over decades.
- Self adhesive laminating sheets for id cards stiffen and seal badges, membership cards, and visitor passes.
- Self adhesive laminating sheets for bookmarks turn cardstock designs into durable keepsakes in under a minute.
- Self adhesive laminating sheets for books reinforce paperback covers and dust jackets, which is why school and public libraries buy them by the case.
- Self adhesive laminating sheets for posters shield wall graphics from sun fade and fingerprints.
- Self adhesive laminating sheets for furniture refresh shelves, drawer liners, and tabletops with a wipeable clear or decorative surface.
- Self adhesive laminating pouches business card formats seal a standard 90 x 54 mm card inside a rigid, wallet proof shell.
Crafters searching for the best self adhesive laminating sheets for stickers should prioritize two specs above all else. Look for a film of 3 mil or thicker for real scratch resistance, and confirm the adhesive is rated for the ink type you print with. Glossy film makes colors pop on decals, while matte film suppresses glare on items that will be photographed or displayed under bright light.
Thick, Holographic, and Specialty Finishes
Standard clear gloss is only the starting point of what pressure sensitive film can do. Specialty facestocks change the look, the feel, and the durability of the finished piece without changing the application technique. Every finish below applies with the same peel, press, and smooth method described earlier.
Self adhesive laminating sheets thick enough to reach 5 to 10 mil transform floppy paper into semi rigid cards that stand up on their own. For decorative work, self adhesive laminating sheets holographic finishes cast rainbow prisms across stickers, planner covers, and event badges, and a holographic cold lamination film doubles as a tamper evident security layer. A matte cold lamination film kills reflections and resists fingerprints, which makes it the professional choice for restaurant menus and trade show graphics.
Common Mistakes to Avoid
Most lamination failures trace back to the same handful of errors, and every one of them is preventable. The adhesive itself almost never fails; technique does. Review this list before your first project and you will skip the learning curve entirely.
Watch out for these frequent missteps:
- Removing the entire liner at once. The film folds onto itself instantly and cannot be separated. Peel progressively.
- Starting in the middle of the document. Air gets trapped with no escape path. Always anchor one edge first.
- Skipping the border. Film cut flush with the paper edge lets moisture wick underneath. Leave 3 to 5 mm all around.
- Pressing too lightly. Weak pressure leaves silvery micro bubbles across dark ink areas. Burnish firmly with a card.
- Laminating over dust or fresh ink. Debris and smears become permanent. Wipe surfaces and let inkjet prints dry for an hour.
Silvering deserves special mention because it confuses so many first time users. Those faint cloudy patches are microscopic air pockets where the adhesive has not yet wet out against the ink. Firm burnishing removes most silvering immediately, and minor traces usually clear on their own within a day as the adhesive continues to flow.
Where to Find Self Adhesive Laminating Sheets Near Me
Searching for self adhesive laminating sheets near me will surface office supply chains, big box retailers, and craft stores within driving distance. Products like self adhesive laminating sheets staples sit alongside pouches and machines in the print aisle, usually in packs of 10 to 50 A4 or letter size sheets. Craft stores stock smaller decorative formats, which suits anyone hunting for self adhesive laminating sheets for stickers nearby the same afternoon.
Retail convenience carries a real cost premium once volume grows, though. A school, print shop, or sticker business that burns through hundreds of sheets a month pays two to four times more per sheet at retail than through self adhesive laminating sheets bulk pricing from a factory source. Those typing self-adhesive laminating sheets near me into a search bar every few weeks are usually better served by a single wholesale order with a 7 to 15 day lead time.
Why Buy Direct from a Laminating Film Manufacturer
Sheet quality is decided at the coating line, not at the checkout counter. Adhesive coat weight, film clarity, and liner release force are set during manufacturing, and inconsistency in any of them causes the bubbling and silvering problems covered earlier. Buying direct puts you one step from the machines and the engineers who run them.
Vizlent has manufactured pressure sensitive materials in Shenzhen since 2011, with in-house coating, siliconizing, and slitting lines certified to ISO 9001, FSC, and SGS standards. More than 1,000 distributors, converters, and print businesses across 50+ countries buy our cold lamination films, thermal lamination films, and label stock factory direct. Custom sizes from A5 sheets to 1300 mm jumbo rolls ship in 7 to 15 days, and you can read more about our facility and testing lab on our about page.
Sourcing sheets for a school, print shop, or product line? Send your specs to our engineering team and get a factory direct quote within 24 hours. Start your inquiry now.
Get Free Laminating Sheet Samples from Vizlent
The fastest way to judge a laminating film is to put it on paper with your own hands. Vizlent provides free A4 sample sheets of our cold lamination range so you can test clarity, tack, and liner release on your own documents before placing an order. Factory direct pricing, custom sizes, and 7 to 15 day lead times back every order we ship to 50+ countries.
Contact our team today for free samples and a quote within 24 hours.
Frequently Asked Questions
How does self adhesive laminating sheets work without a machine?
Self adhesive laminating sheets work through a pressure sensitive acrylic adhesive that bonds to paper when pressed by hand, so no machine or heat is needed. The adhesive is pre-covered onto the clear film at the factory and protected by a release liner until use. Pressing with a squeegee forces the adhesive to flow into the paper surface, and the bond reaches full strength within about 24 hours.
Are self adhesive laminating sheets waterproof?
Self adhesive laminating sheets are water resistant on the laminated face and become effectively waterproof when both sides are sealed with an overlapping film border. A single sided application still leaves the paper back exposed to moisture. For items that face spills or outdoor conditions, laminate both sides and leave a 3 to 5 mm sealed edge all the way around.
Can I use self adhesive laminating sheets for stickers?
Yes, self adhesive laminating sheets are the standard way to protect homemade and small batch stickers printed on inkjet vinyl. The clear film shields the ink from scratching, moisture, and UV fading, which lets decals survive water bottles, laptops, and car bumpers. Apply the laminate to the printed sheet before cutting individual stickers so every decal gets full edge to edge coverage.
Can you remove a self adhesive laminating sheet after applying it?
No, a self adhesive laminating sheet cannot be removed cleanly once the adhesive has bonded to paper. The acrylic adhesive penetrates the paper fibers within minutes, and pulling the film off tears the document surface with it. Premium films offer a brief repositioning window of a few seconds during application, so careful alignment before pressing is the only reliable safeguard.
What thickness of laminating sheet should I choose?
A 3 mil film suits most everyday documents, while 5 mil and thicker sheets add card-like rigidity for ID badges, menus, and tags. Thinner 1.5 mil films stay flexible and conform well to curved or textured items. Match thickness to handling frequency: the more often an item is touched, carried, or wiped, the thicker the film should be.
Do self adhesive laminating sheets turn yellow over time?
Quality PET and acrylic based laminating sheets stay clear for many years, while cheap films with rubber based adhesives can yellow within months of sun exposure. UV stabilized facestocks and pH neutral adhesives are the two specs that prevent discoloration. For photographs and archival documents, choose a film specifically rated as photo safe and acid free.
Can I cut self adhesive laminating sheets to size?
Yes, self adhesive laminating sheets cut cleanly with scissors, craft knives, rotary trimmers, and die cutting machines both before and after application. Cutting after application gives the cleanest result because the film and paper are trimmed together in one pass. Always leave a sealed border rather than cutting flush to the document edge, unless the item will be kept dry.
What is the difference between self adhesive sheets and thermal laminating pouches?
Self adhesive sheets bond through hand pressure at room temperature, while thermal pouches require a heated laminating machine to melt their adhesive layer. Cold application protects heat sensitive items like inkjet photos, thermal receipts, and vinyl, and it needs no equipment or power. Thermal pouches suit high volume office work where a machine is already available and documents tolerate heat.